Creating and Accessing Assessments in the Assetic Mobile App
Objective: Gain an understanding of how to create an assessment form and how to configure Assetic to utilise the form while performing assessment tasks using the Assetic Mobile app.
Outcomes: The user will be able to create an assessment form, assign it to a project and have it available to individuals to be completed within Assetic Mobility.
Prerequisites: These actions require some settings to be configured prior to commencing.The 'Client Admin' role is required to create assessment forms.
The Assetic mobile application enables the managing of assessments, work requests, and work orders. Refer to Assetic Assessments module to gain an understanding of how assessments are handled in Assetic.
The following workflow has been designed to enable Assetic users to capture, plan, and execute tasks seamlessly.
To gain a detailed understanding of creating and configuring custom assessment forms to be used by the Mobility application. please refer to the Manage Custom Assessment Forms article.
Step 1: Create an Assessment Form
Select 'Admin' in the navigation sidebar and then 'Assessment' in the navigation dropdown menu. The user will be taken to the forms section which will display the following screen.
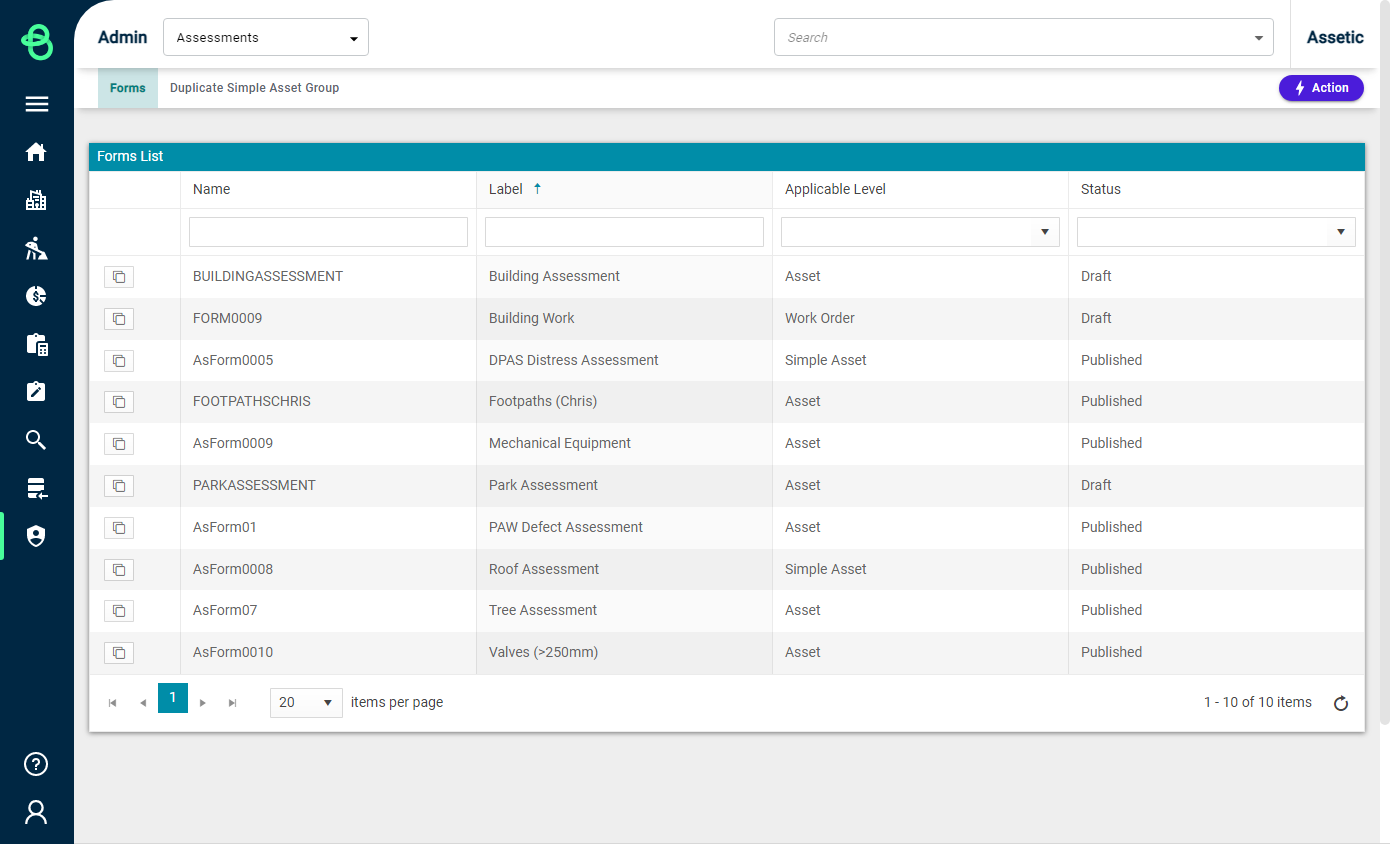
To create a new form select the 'Actions' button on the right and select 'Add Form'.

Fill in the relevant fields within the "Add Form" dialogue box that appears. Then, select 'Save' once completed.
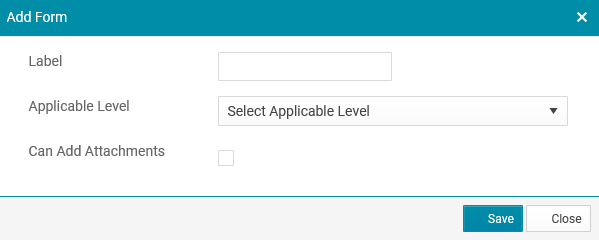
Label: A free-text field to name the form.
Applicable level: A drop-down menu to select from Asset, or Work Order, which determines the object this form applies to.
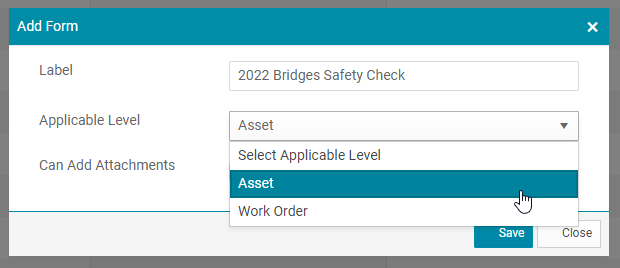
Can Add Attachments: Select this box to allow users to attach photographs or be able to upload documents during the assessment.
Select Save.
Once saved, the next step is to build a custom form that meets the requirements of the assessment task.
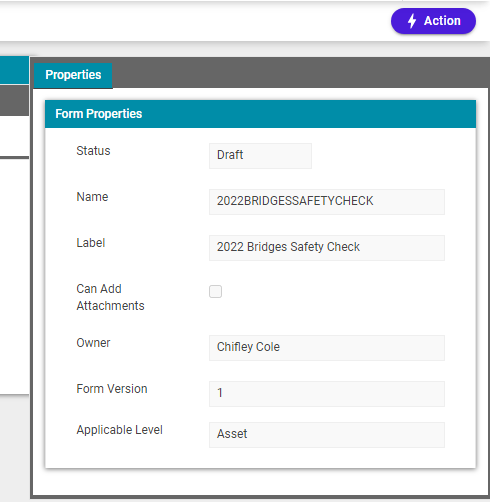
Form details appear on the box called 'Form Properties' on the right of the screen.
-
Status: This shows the status of the form, which is in 'Draft' status until the user publishes the form.
-
ID: The ID of the form is system populated and cannot be edited by the user.
-
Label, Can Add Attachments, Applicable Level : As described above in 'Add Form'.
-
Owner: The creator of the form. Only the form owner can edit a form. However, ownership of a form can be changed if required.
-
Form Version: Form version (this feature will be implemented in the future).
The form creation process is flexible and allows a user to create a form that limits the inputs to the data collector, and make some fields compulsory prior to saving.
To commence building the form, select the Actions menu and choose 'Edit Form'. The draft form is displayed and can now be updated.
It is recommended that during the creation of the custom form, to avoid losing any information, that the user saves it regularly. Select the actions menu and select 'Save form' during the creation phase. When finished, select 'Save and Finish Editing Form' from the Action Panel to end the session.
For a detailed overview, please review Manage Custom Assessment Forms.
Once satisfied with the design of the custom form, select the 'Actions' button and select 'Publish' to allow for the form to be available for use.
Step 2: Create a Project
Navigate to the 'Assessments' module in the Navigation Sidebar and choose 'Manage Assessments' from the Navigation Dropdown menu, then select the 'Projects' tab from the top left.
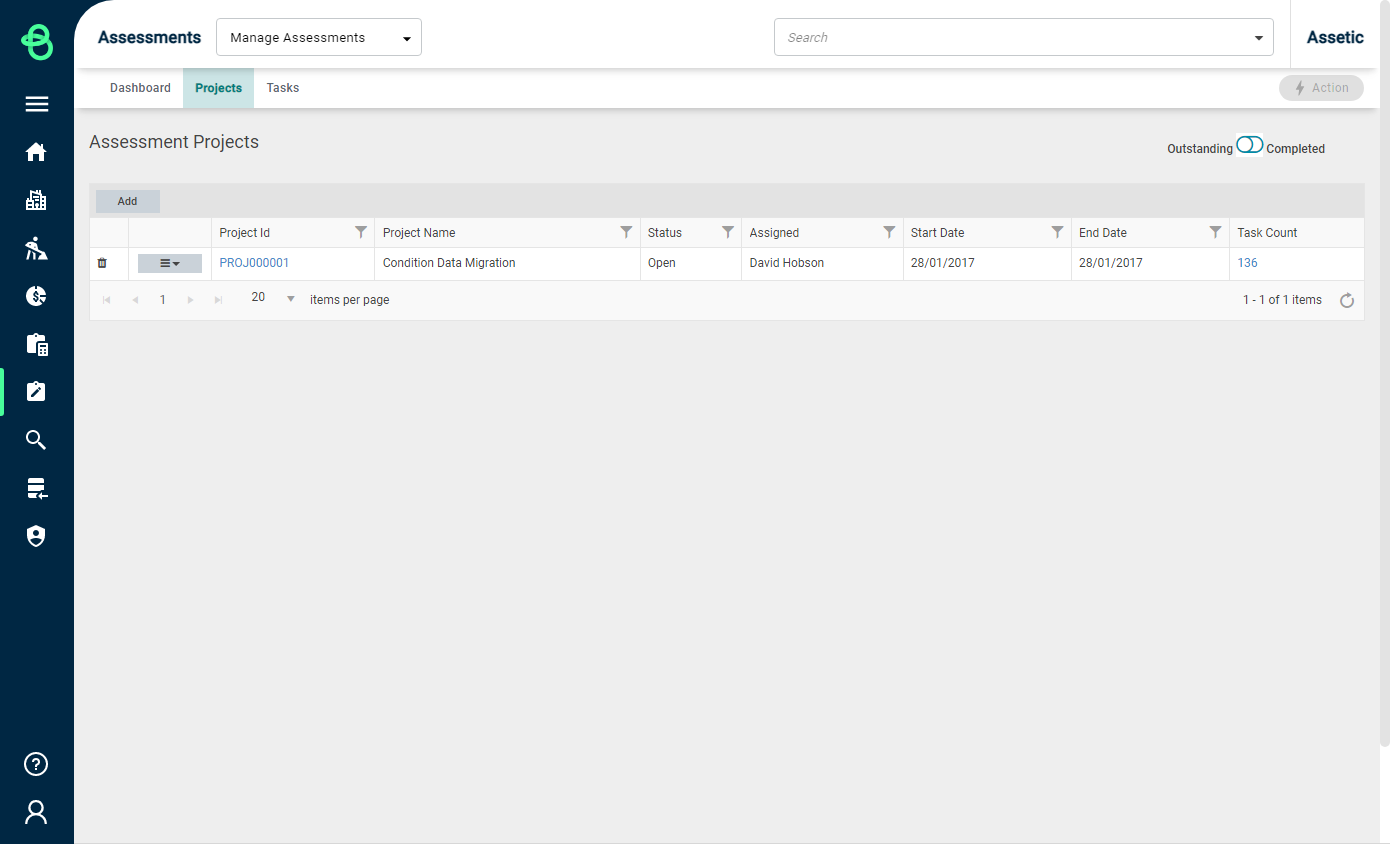
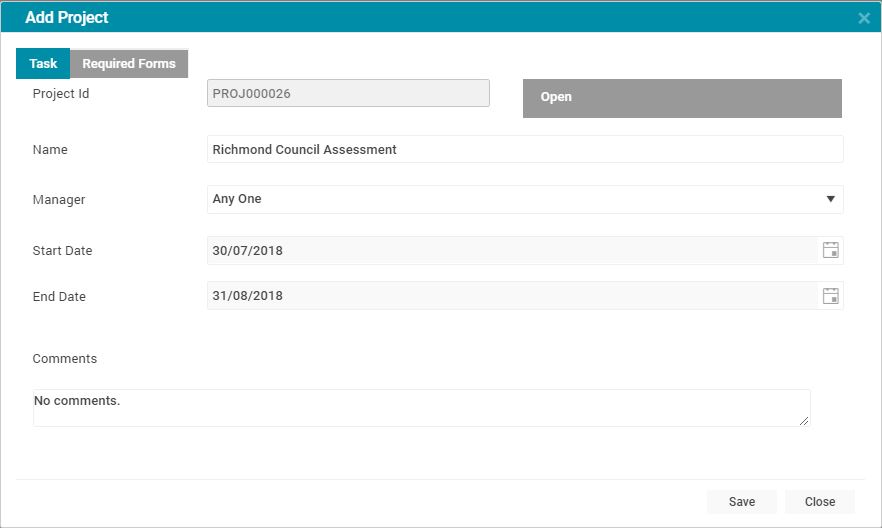
Select 'Add' from the Projects table, window will appear.
-
Project Id: System generated, iterates a new Id for each project.
-
Name: The name of the Project
-
Manager: Select from the list of available Managers. This list is configured from the Admin module.
-
Start Date: Enter the proposed Start Date of the project from the calendar.
-
End Date: Enter the proposed End Date of the project from the calendar.
-
Comments: Add any relevant comments to the project.
One all fields have been populated, select 'Save'.
Step 3: Add the Assessment Form to the Project
Re-open the created project and then select the 'Required Forms' tab.
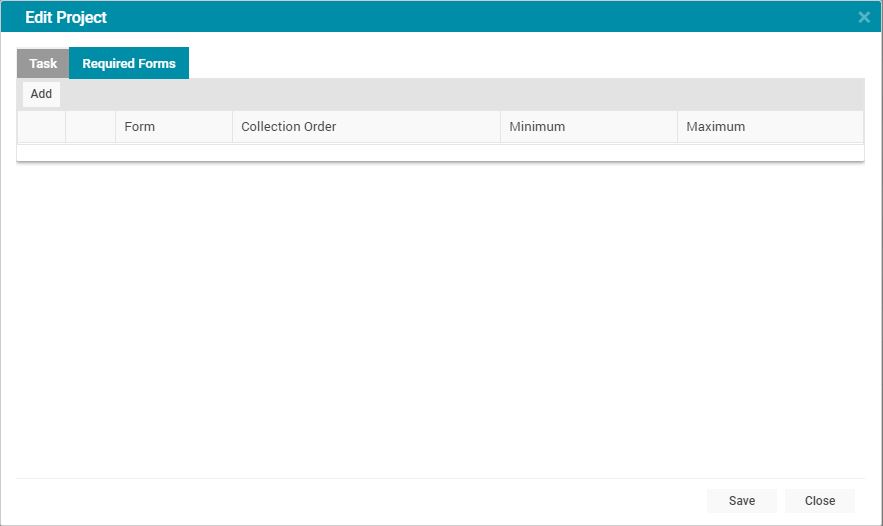
Select the 'Add' button.
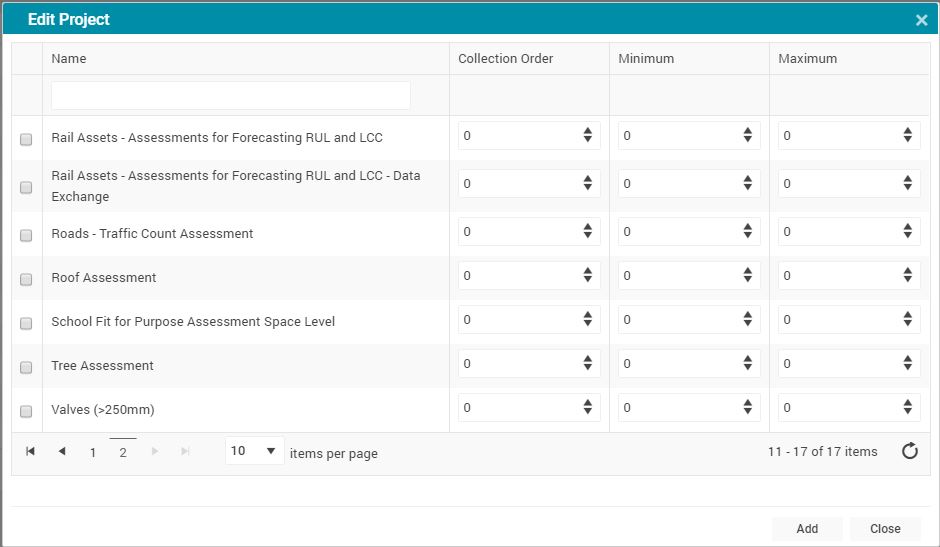
Search for the form that has been created, select the check box and complete the following details.
-
Collection Order: is taken into account when a project has multiple forms. It is the order in which the forms are required to be collected. In this example, there is just 1 form.
-
Minimum: The required number of times the form is to be completed before an assessment task of the project can be deemed complete. If a minimum is set and not yet met, mobile users will be unable to 'skip' the form.
-
Maximum: The maximum number of times a form can be completed for an assessment task of the project.
When finished, select the 'Add' button.

Then select 'Save' to finish editing the project.
Step 4: Selecting the Assets to be Assessed
Select an existing Advanced Search Profile or create a new Advanced Search Profile by following these steps.
Navigate to the Search module in the navigation sidebar and then to Advanced Search in the navigation drop down menu.
Select an Advanced Search Profile to filter for the assets that are to be assessed as part of the project.
Adding the Assessment Tasks to the Project is performed with a Bulk Operation.
With the Advanced Search Profile loaded, navigate to the 'Fields and Filter' tab. Select the 'Actions' button and select 'Bulk Operation On'.
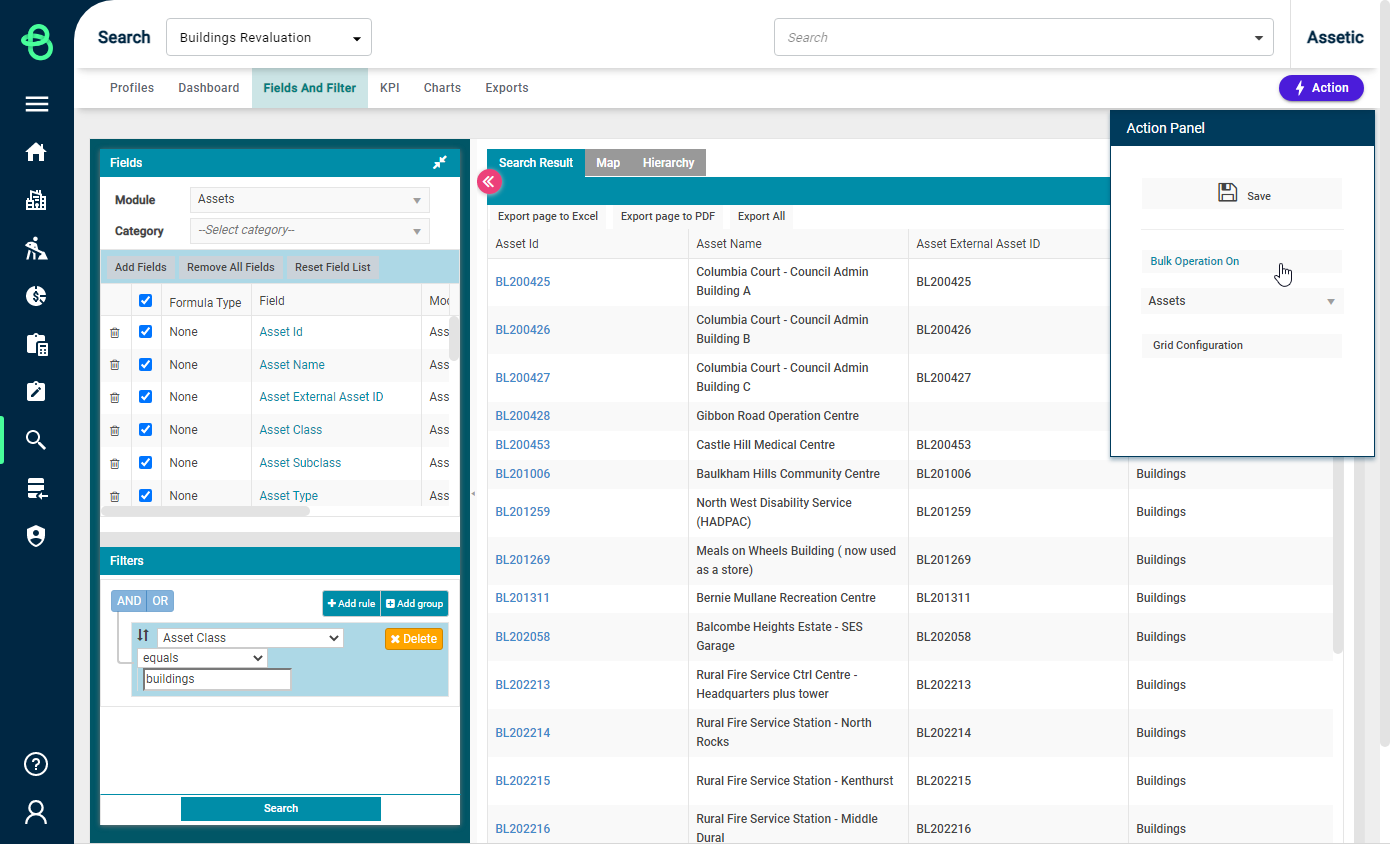
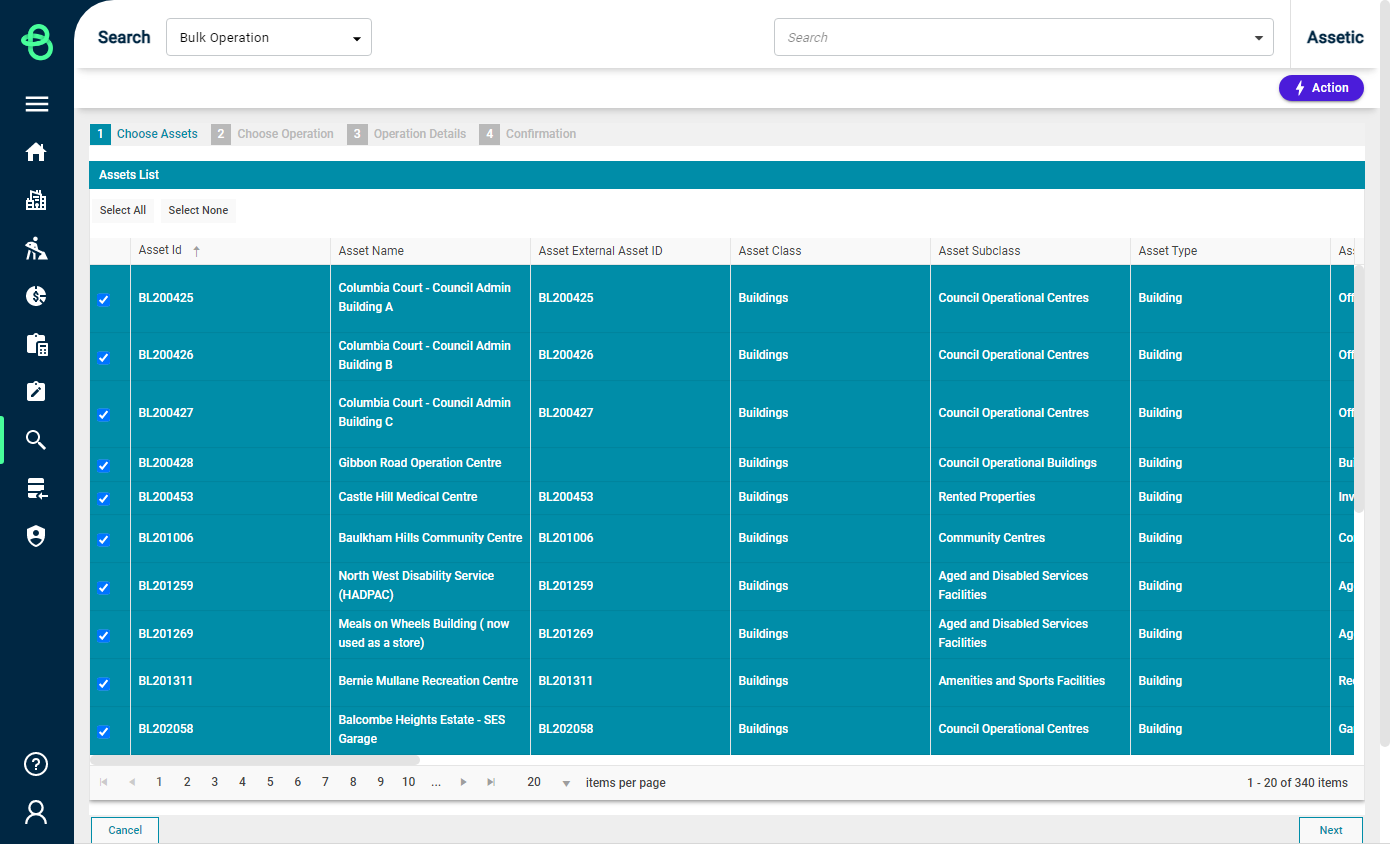
Select the required assets and select 'Next'.
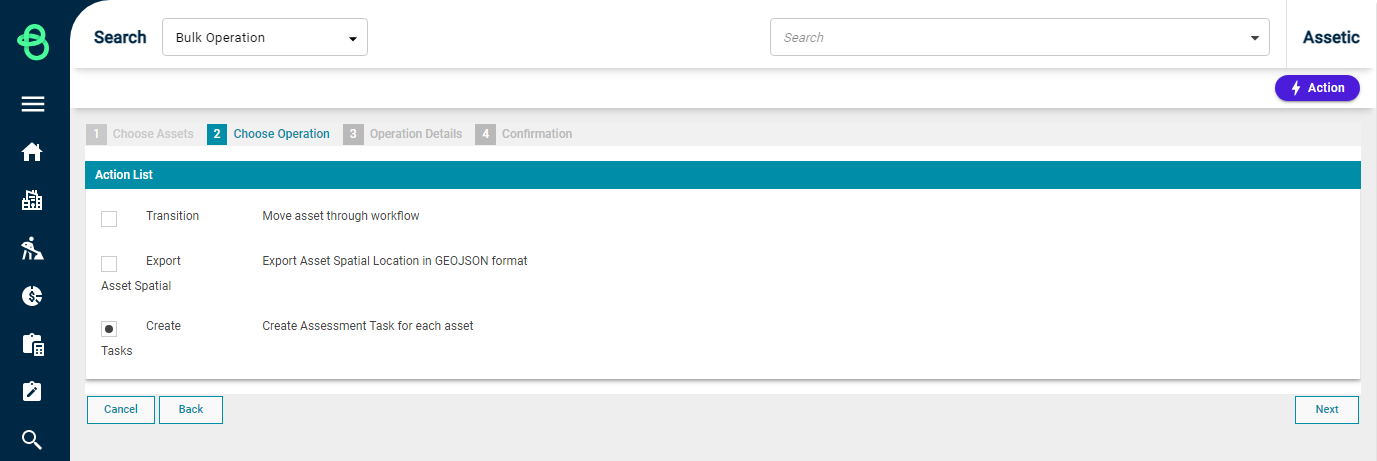
From the Actions list, select the required option.
In this example, select 'Create Tasks' and then click "Next'.
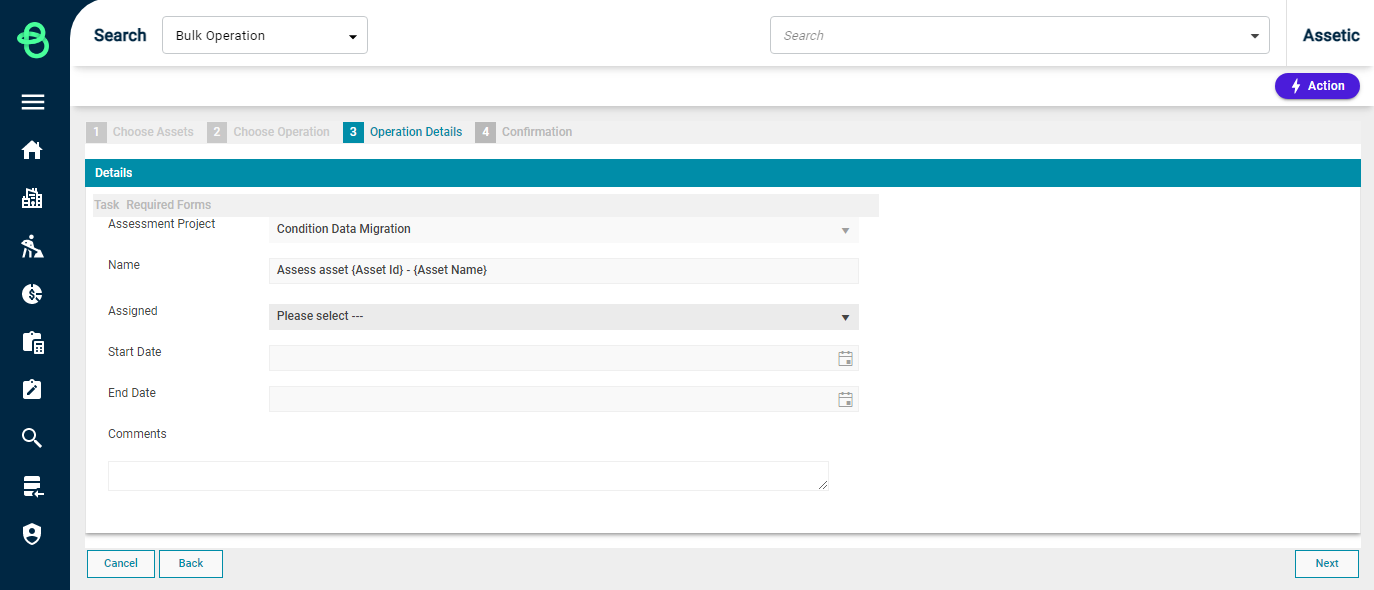
Select the Project from the Assessment Project drop-down menu.
-
Name: The name format required for the assessment tasks that will be created.
-
Assigned: Assigns the project to a valid system user that will be able to view and edit the project on their mobile device running the Assetic mobile application.
-
Start Date: Project start date.
-
End Date: Project end date.
-
Comments: Any comments.
Once completed select 'Next'.
NOTE It is important to populate the 'Assigned' field. Otherwise, the assessments will not appear in Assetic Mobility.
On the 'Confirmation' screen double-check and confirm all of the details are correct. Once confirmed select the 'Submit' button.
Assetic will now begin to process the creation of the tasks and the assessments will be available to users of the Assetic Mobility application.
Step 5: Accessing the assessment tasks via the Assetic Mobile application
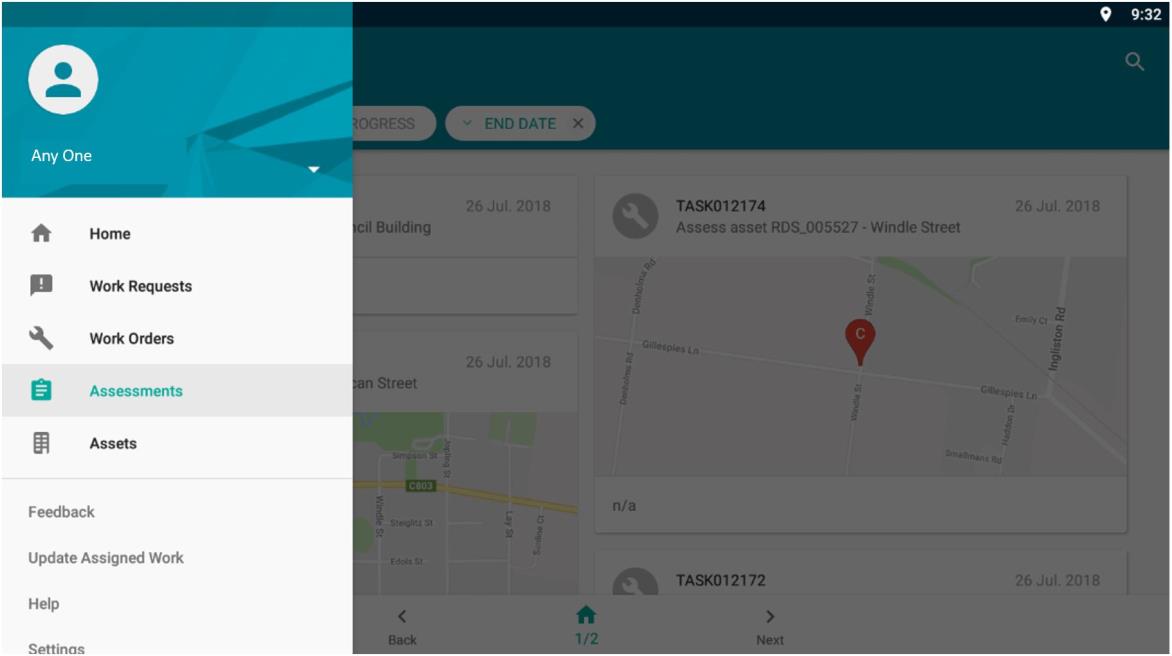
Open the Brightly Assetic app and select the  list button to access the menu.
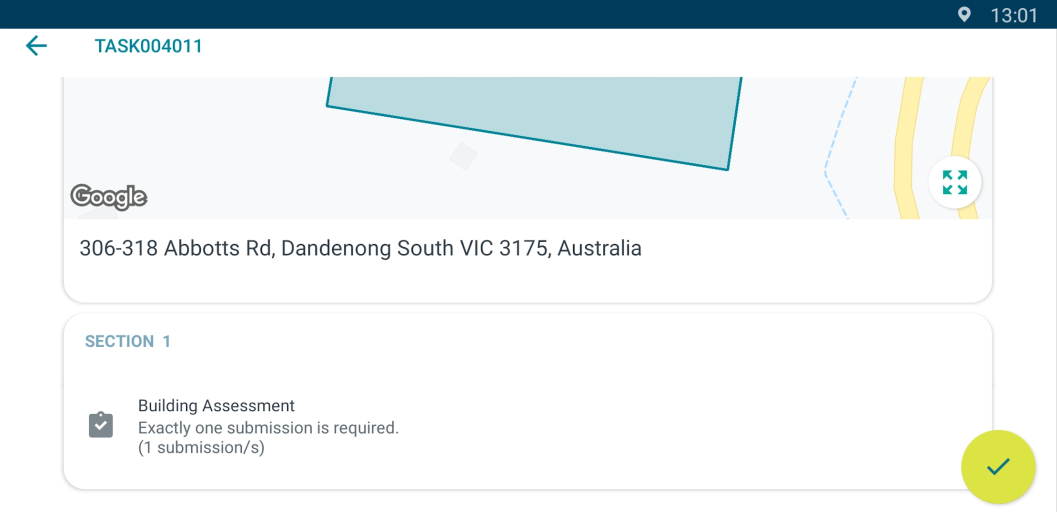
Select 'Assessments' to view the assessment tasks assigned to the user.
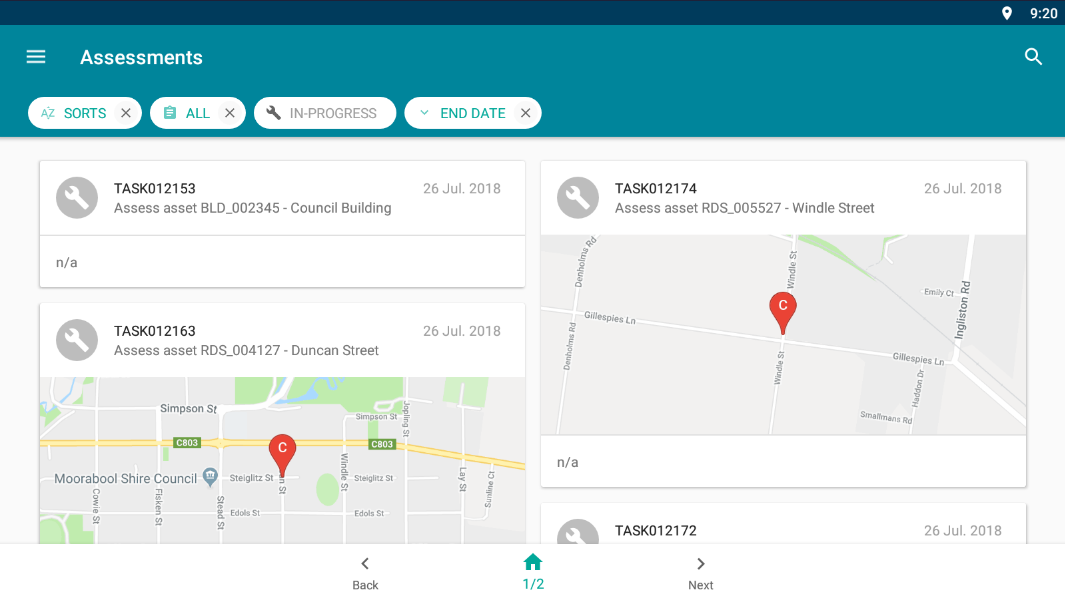
Additional details about the assessments are able to be viewed by tapping the task of choice.
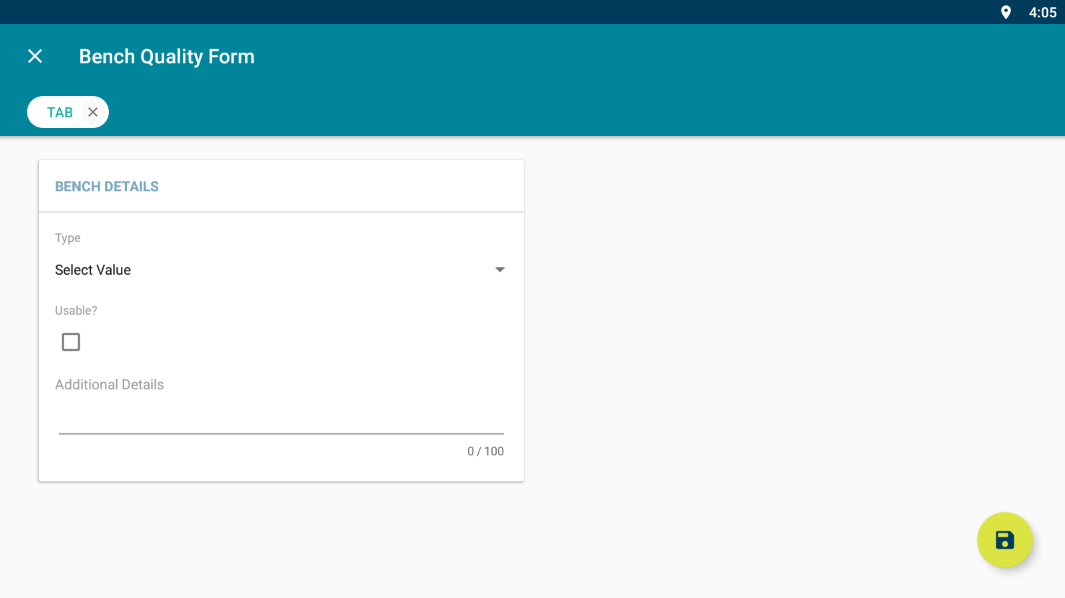
Please note the example assessment form created in Step 1 (Bench Quality Form) appearing within the example TASK000160.
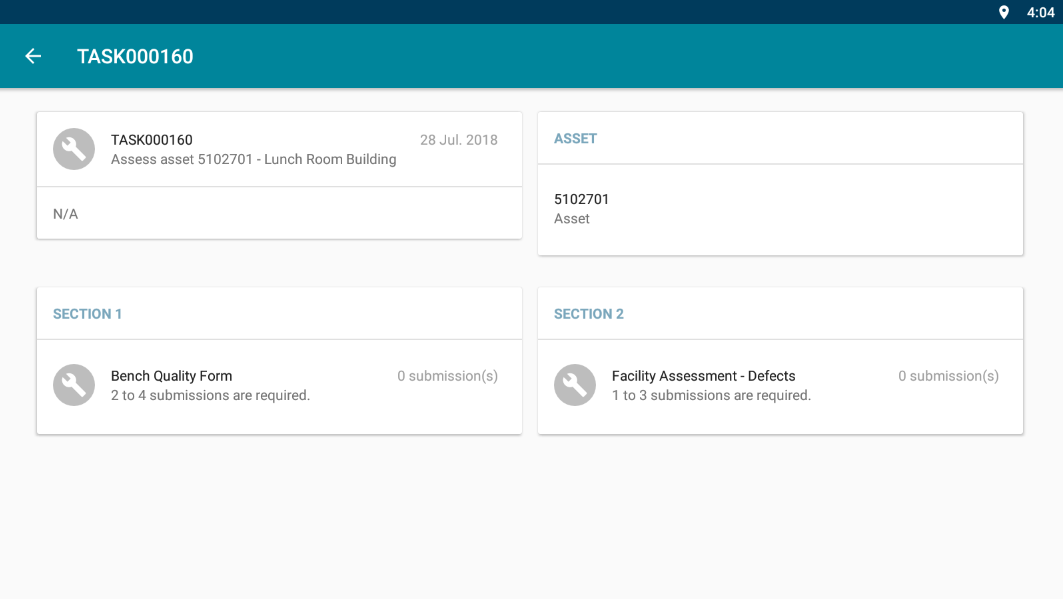
To open an assessment form to be completed, select the form of choice and tap "Assess".
Once the form is completed tap the save icon  to save and submit.
Once all required forms on the Assessment Task have been completed, select the submit button  . To finalise and synchronise the completed form data to the Assetic Cloud environment.
NOTE Logging out will result in the loss of any unsynced data. To prevent data loss, ensure the device's sync is up to date before logging out.
